Easy Origami Paper Hyacinths: Step-by-Step Flower Craft
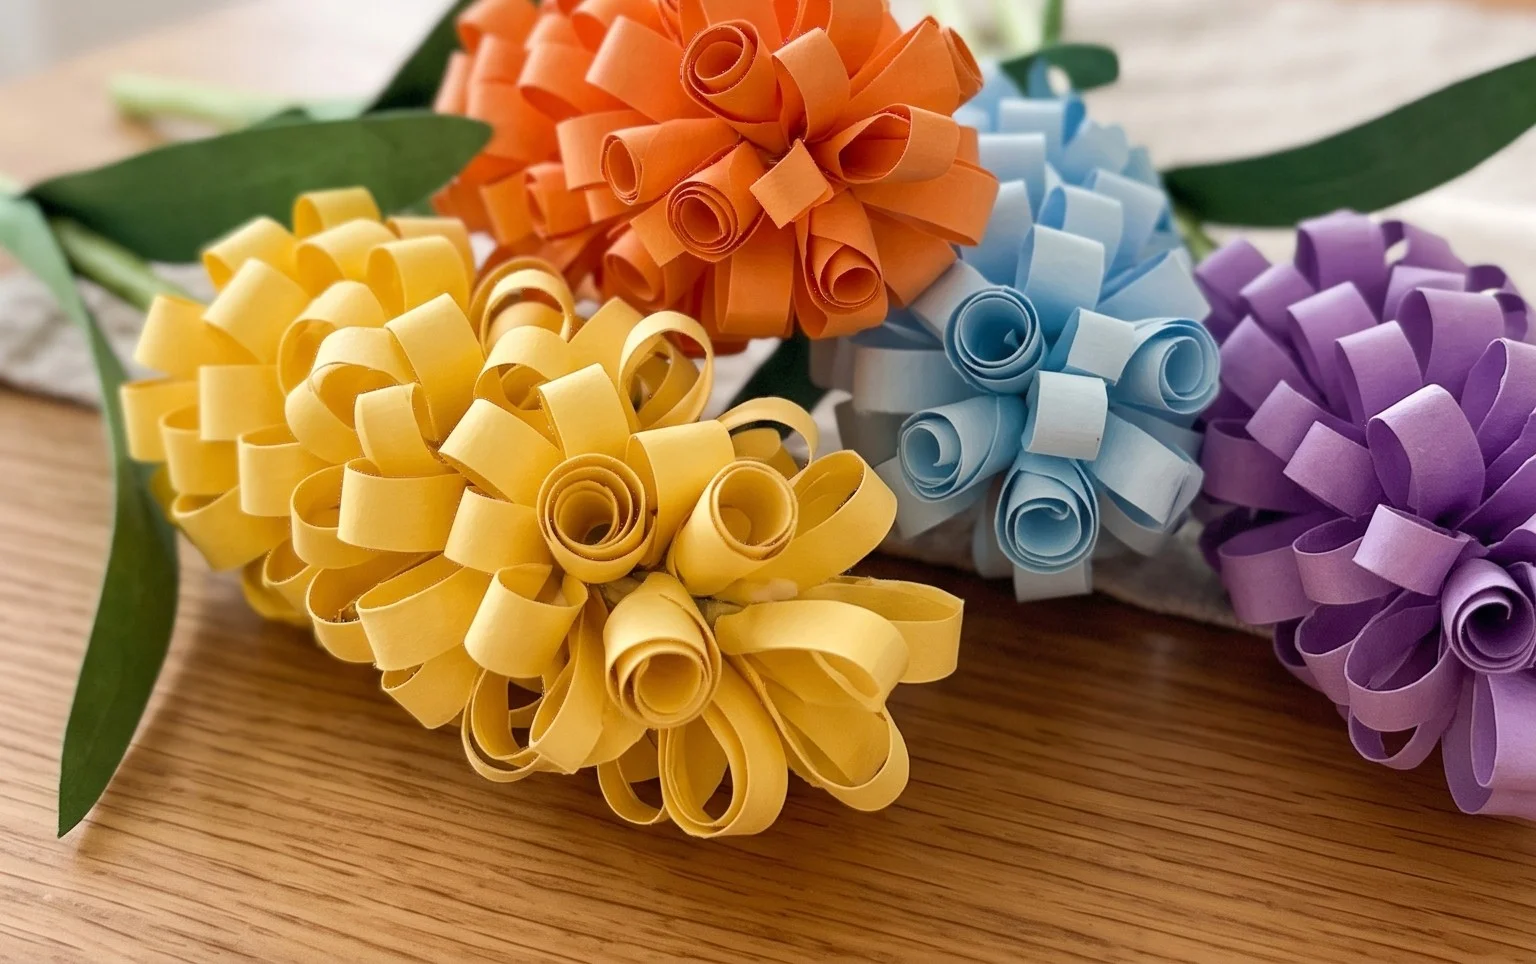
How to Make Paper Hyacinth Flowers is a delightful origami project that brings a touch of spring into your home, no matter the season! Imagine a cluster of these beautiful paper blossoms, their textured petals fanned out in a graceful spiral, just like their real-life counterparts. They’re perfect for crafting with kids, creating charming handmade gifts, or adding a pop of color to your decor. This easy-to-follow tutorial is designed for complete beginners, and you can expect to create a lovely hyacinth in about 10-15 minutes. Together, we’ll learn the simple folds and techniques to bring these charming paper flowers to life, step by step. Let’s get our paper ready and start folding!

How to Make Paper Hyacinth Flowers
Hello there, lovely origami enthusiasts! I’m so excited to guide you through creating these beautiful paper hyacinth flowers. Hyacinths are one of my favorite spring blooms, and bringing their vibrant colours and delicate texture to life with paper is incredibly rewarding. These models are surprisingly straightforward once you get the hang of a few key folds, making them a fantastic project for beginners looking to expand their paper folding repertoire. We’ll go through everything step-by-step, ensuring you can create a whole bouquet of these cheerful flowers.
Choosing Your Paper
The paper you choose will significantly impact the final look and feel of your hyacinth. For these flowers, I highly recommend using origami paper. It’s specifically designed for folding, meaning it’s crisp, holds creases well, and is usually a consistent weight.
Type: Standard origami paper is perfect. It’s thin enough to allow for many layers of folds without becoming too bulky, yet strong enough to hold its shape. Avoid cardstock or very thick construction paper, as they will make the intricate folds very difficult, if not impossible. Conversely, very thin tissue paper can be too fragile and tear easily during the folding process.
Weight: Look for paper in the 70-90 gsm (grams per square meter) range. This is a common weight for origami paper and offers a good balance of durability and foldability.
Size: For your first few attempts, I suggest starting with a 15cm x 15cm (6 inch x 6 inch) square. This size is manageable for learning the folds and will result in a lovely, medium-sized flower. Once you’re comfortable, you can experiment with smaller sizes for a daintier look or larger sizes for more dramatic arrangements.
Single or Double-Sided: This is where you can really have some fun with customization! You can use single-sided origami paper (white on one side, coloured on the other) or double-sided paper (coloured on both sides).
- Single-sided: If you use single-sided paper with a coloured side and a white side, the white side will show through in some areas of the flower, creating a lovely subtle shading effect. This can add depth and a more naturalistic appearance.
- Double-sided: Using double-sided paper will give you a uniformly coloured flower. If you choose patterned double-sided paper, you’ll get a wonderfully unique and decorative hyacinth! For a classic hyacinth look, I often opt for single-sided paper in shades of pink, purple, blue, or white.
The Base Folds: Building Blocks of Your Hyacinth
Before we dive into the specific steps for the hyacinth, let’s get familiar with a couple of fundamental origami folds that are crucial for this model. Practicing these will make the rest of the process much smoother.
The Valley Fold
A valley fold is the most basic fold in origami. Imagine you are creating a “valley” in the paper. You bring one edge or corner to meet another edge or corner, and then crease the paper along the line where they meet. When you unfold, the crease will look like a “V” shape, hence the name “valley.” For this model, we’ll be using many valley folds to shape the petals.
The Mountain Fold
A mountain fold is the opposite of a valley fold. Instead of creating a “V,” you’re creating an inverted crease that resembles a mountain peak. To make a mountain fold, you often crease a line in the opposite direction to a valley fold. For example, if you’ve made a valley fold and then want to reverse that crease to form a mountain fold, you would simply press down on the existing valley crease from the other side. Many of the shaping steps in this hyacinth will involve manipulating existing valley folds into mountain folds.
Making Clean Folds: The secret to beautiful origami is crisp, precise folds. Always align edges and corners as accurately as possible. Once you’ve made the alignment, run your fingernail firmly along the crease. This ensures the fold is sharp and stays in place. Don’t be afraid to go over a crease a couple of times to make it really defined.
Step-by-Step Hyacinth Folding Sequence
Let’s get folding! We’ll start with a square of origami paper. For the non-alcoholic sake of clarity, imagine your paper is coloured side up if you’re using single-sided paper. If you’re using double-sided paper, pick a side to be the “outside” of your flower.
- Prepare your square: Place your square of paper in front of you, coloured side up if applicable.
- Diagonal Fold: Bring the bottom left corner up to meet the top right corner. Crease firmly. Unfold. Now, bring the bottom right corner up to meet the top left corner. Crease firmly. Unfold. You should now have two diagonal creases forming an “X” on your paper.
- Flip and Fold in Half: Flip the paper over so the white side is facing up. Bring the bottom edge up to meet the top edge. Crease firmly. Unfold. Now, bring the left edge over to meet the right edge. Crease firmly. Unfold. You should have a horizontal and a vertical crease.
- Form the Waterbomb Base: This is a key base for many origami models. With the white side still facing up, gently push the left and right sides of the paper inwards. The existing creases will help guide this. As you push inwards, the top flap will naturally come down. Bring the top point down to meet the bottom point, flattening the paper into a smaller square. You should now have a square with four flaps meeting at the bottom point. The coloured side should be facing outwards on this smaller square. This is your waterbomb base.
- Prepare the Petal Flaps: With the waterbomb base in front of you (the open ends are at the top), take the top right flap. Bring its bottom edge up to meet the center vertical crease. Crease firmly. Repeat this with the top left flap, bringing its bottom edge to meet the center vertical crease. Crease firmly.
- Fold Down the Top Triangle: You will see a small triangle pointing upwards at the top of the paper. Fold this triangle down along the line formed by the top edges of the flaps you just folded in. Crease firmly.
- Unfold the Petal Folds: Now, unfold the two side flaps you just folded in step 5. Also, unfold the small triangle you folded down in step 6. You should be back to the waterbomb base, but with new creases on the top layer of flaps.
- Petal Fold: This is where we begin to shape the petals. Take the top right flap. Using the creases you just made, lift the bottom point of this flap upwards. As you lift, the sides should begin to fold inwards along the existing creases, creating a kite shape. Flatten this kite shape. This is one petal.
- Repeat for All Petals: Turn the model over and repeat steps 5 through 8 on the other side. You should now have a diamond shape with four pointed flaps (petals) at the top.
- Shape the Flower Center: Look at the four flaps that form the “petals.” At the very tip of each flap, there’s a small opening. Gently insert your finger or a toothpick into the opening of one of the flaps. Carefully pull outwards and slightly downwards. This will “open up” the petal and create a more rounded, petal-like shape. This is a delicate step, so go slow. Repeat this for all four petals.
- Form the Stamen/Center Bud: Now, look at the very bottom point of your flower. There are four small points here, one on each side of the base. Gently pull these points outwards and slightly upwards. This will give the flower a more rounded base and begin to form the center bud.
- Final Shaping: You can gently curve the petals outwards with your fingers to give the hyacinth a more natural, blooming appearance. You can also gently pinch the base to make it more compact.
Common Beginner Pitfalls and How to Avoid Them
Don’t worry if your first few attempts aren’t perfect! Origami is a skill that improves with practice. Here are a couple of common spots where beginners sometimes get stuck, and how to steer clear of them.
- Imperfect Waterbomb Base: The waterbomb base (step 4) is crucial. If your base isn’t a neat, symmetrical square, the rest of your folds will be misaligned. How to avoid: Ensure you’re aligning the corners and edges precisely in steps 2 and 3. When you push the sides in for the waterbomb base, let the existing creases do the work. Don’t force the paper. It should naturally collapse into the square shape. If it feels like you’re fighting the paper, go back and check your initial diagonal and horizontal/vertical folds.
- Struggling with the Petal Fold: Step 8, the petal fold, can be tricky because it involves reversing creases and bringing new edges together. How to avoid: Really look at the creases you made in steps 5 and 6. They are your guides. Imagine you are “opening up” the flap and then allowing the sides to fold inwards along those lines. Don’t try to fold a new crease; you’re using existing ones. If it’s not working, try unfolding slightly and re-aligning before flattening.
- Over-Opening the Petals: When shaping the petals in step 10, it’s tempting to pull them out too far, which can make the flower look flat or even tear the paper. How to avoid: Be gentle! You’re just trying to create a slight curve or opening. Imagine you’re gently nudging the paper, not yanking it. The goal is to give a hint of dimension, not to flatten the flower entirely. It’s better to under-open and add more later than to over-open and damage the paper.
Varying Your Hyacinth Flowers
Once you’ve mastered the basic fold, the fun truly begins with customization! Paper hyacinths are wonderfully versatile.
- Size: As mentioned earlier, using smaller squares of paper (like 7.5cm x 7.5cm or even 5cm x 5cm) will create miniature hyacinths, perfect for tiny bouquets or embellishments. Larger squares (20cm x 20cm or more) will result in statement flowers.
- Paper Pattern: This is where you can get really creative. Try patterned origami paper for a unique, decorative look. Floral patterns, geometric designs, or even marbled papers can create stunning effects. For a more rustic feel, you could even experiment with patterned wrapping paper or decorative scrapbook paper, though be mindful of the weight and how easily it creases.
- Colour: The classic hyacinth colours are beautiful – soft pinks, deep purples, vibrant blues, and crisp whites. But why stop there? Imagine a sunny yellow hyacinth, a fiery orange one, or even a gradient paper for a ombre effect. Mixing and matching colours for a bouquet can be incredibly striking.
Displaying and Gifting Your Paper Hyacinths
These little blooms are so charming, and there are countless ways to enjoy them!
- Bouquets: Fold several hyacinths in various colours and sizes and arrange them into a beautiful paper bouquet. You can tie them together with ribbon or string, or even place them in a small vase. For a more realistic stem, you can attach them to floral wire or thin wooden dowels.
- Garlands and Bunting: String your hyacinths together to create a lovely floral garland for decorating a room, a party, or a special event.
- Table Centerpieces: Arrange a collection of hyacinths in a bowl or a decorative container for a delightful and long-lasting centerpiece.
- Gift Toppers: Attach a single hyacinth to a gift box or card for a beautiful, handmade embellishment that shows you’ve put extra thought into your present.
- Craft Projects: They can be used to decorate journals, scrapbooks, picture frames, or even as elements in larger papercraft creations.
- Party Favors: For weddings, birthdays, or baby showers, a single paper hyacinth makes a thoughtful and beautiful party favor for your guests to take home.
I hope you’ve enjoyed folding these paper hyacinth flowers with me! They’re a wonderfully satisfying project that brings a touch of springtime cheer into your home. Remember, practice makes perfect, so keep folding, keep experimenting, and most importantly, have fun with your paper creations!
Conclusion
Congratulations on making your own beautiful paper hyacinth flowers! We hope you enjoyed this tutorial. Don’t worry if your first attempt isn’t perfect – every origami fold is a learning experience, and practice truly makes progress. We encourage you to try making a whole bouquet of these cheerful blooms!
Once you’ve mastered this design, why not experiment? Try using different patterned papers for a unique look, or perhaps create a smaller version for delicate accents. We have many more exciting paper projects waiting for you to explore!

