Easy Triskele Paper Globes: 3D Origami Ornaments
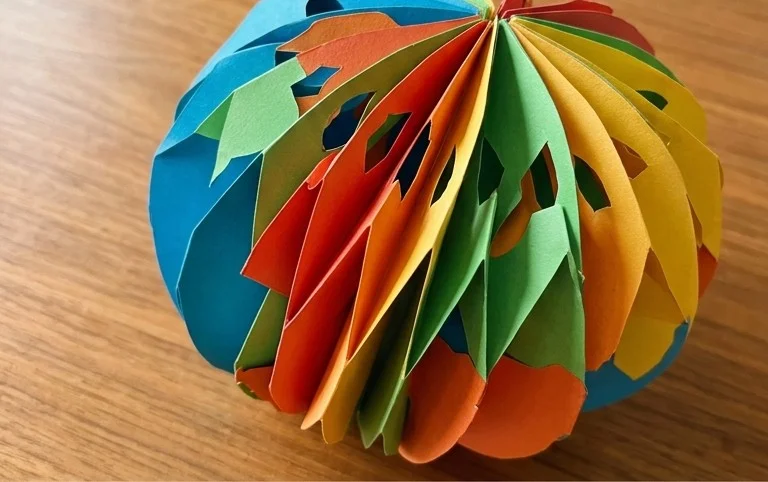
Triskele Paper Globes are truly stunning handmade 3D ornaments that will bring a touch of magic to your home! Imagine a beautiful, intricate sphere composed of three elegantly folded sections, each curving and interlocking to create a mesmerizing, almost celestial form. These unique creations are perfect for anyone looking to craft something special, from complete beginners eager to try their hand at origami to older kids seeking a fun and rewarding project. They also make incredibly thoughtful handmade gifts or exquisite decorations for any occasion.
With just a bit of paper and your own two hands, you’ll learn how to transform flat sheets into these captivating three-dimensional wonders. We’ll guide you through each fold step-by-step, making the process enjoyable and accessible. Get ready to unleash your creativity and create your very own Triskele Paper Globes!

Crafting Your Own Triskele Paper Globes: A Step-by-Step Journey
Hello there, fellow paper enthusiasts! I’m so excited to guide you through creating your very own Triskele Paper Globes, inspired by the beautiful designs of Hattifant. These aren’t just simple folds; they’re stunning 3D ornaments that bring a touch of magic to any space. If you’re looking for a rewarding and visually impressive origami project, you’ve come to the right place. We’ll take it slow, step by step, and by the end, you’ll have a collection of these gorgeous globes to adorn your home or gift to loved ones.
Choosing the Right Paper: The Foundation of Your Globe
The paper you choose is crucial for the success and beauty of your Triskele Paper Globes. For these models, I’ve found that a good quality, slightly heavier paper works best.
- Type of Paper: Look for papers specifically designed for origami, cardstock, or even good quality scrapbook paper. Avoid very thin, flimsy paper like printer paper, as it won’t hold the shape well.
- Weight: A weight between 90-120 gsm (grams per square meter) is ideal. This provides enough structure to keep the globe looking crisp and three-dimensional without being too stiff to fold.
- Size: You’ll typically start with square pieces of paper. Standard origami paper sizes like 6 inches (15 cm) or 8 inches (20 cm) square are excellent starting points. Larger squares will result in larger globes.
- Single or Double-Sided: This is where you can get really creative!
- Single-Sided Paper: If you use single-sided paper, the inside of your globe will be white. This can create a lovely contrast, especially with dark-colored paper.
- Double-Sided Paper: Double-sided paper, where both sides are colored or patterned, will make the inside of your globe echo the outside. This creates a more uniform and often more striking effect. For beginners, I often recommend starting with a solid color on both sides or a subtle pattern that doesn’t distract from the folding.
Make sure your paper is crisp and free of creases before you begin.
Understanding the Base Folds: Precision is Key
Before we dive into the step-by-step sequence, let’s talk about the foundational folds. The beauty of the Triskele globe lies in the precision of its folds, which create the intricate three-dimensional structure. The most important aspect here is making your creases sharp and accurate.
- Valley Folds: These are folds that go inwards, like a valley. You’ll often be bringing two edges or corners together. Run your fingernail or a bone folder firmly along the crease to make it sharp.
- Mountain Folds: These are folds that go outwards, like a mountain peak. You’ll often fold a section of the paper back on itself. Again, sharp creases are essential.
When I describe folds, I’ll be specific about which edge meets which corner, and which side of the paper is facing up. Always try to align your edges and corners perfectly before making a crease. It might take a little practice, but the better your base folds, the more beautiful your finished globe will be.
Your Triskele Paper Globe: A Step-by-Step Folding Sequence
Now, let’s get folding! We’ll assume you’re starting with a square piece of paper, white side up (if using single-sided paper).
1. Start with your square piece of paper. If you’re using single-sided paper, place it with the white side facing up.
2. Fold the paper in half diagonally, bringing the bottom-left corner up to meet the top-right corner. Crease firmly. Unfold the paper.
3. Now, fold the paper in half diagonally again, this time bringing the bottom-right corner up to meet the top-left corner. Crease firmly. Unfold the paper. You should now have an ‘X’ shape of creases on your paper.
4. Flip the paper over so the colored side is facing up.
5. Fold the paper in half horizontally, bringing the bottom edge up to meet the top edge. Crease firmly. Unfold the paper.
6. Fold the paper in half vertically, bringing the left edge over to meet the right edge. Crease firmly. Unfold the paper. You should now have a ‘+’ shape of creases on your paper, in addition to the diagonal creases.
7. Now, we’re going to collapse the paper into a preliminary base. Gently push the sides inwards along the vertical and horizontal creases. As you do this, the top edge will naturally start to come down. Bring the top edge down to meet the bottom edge, collapsing the paper into a smaller square. This is called a preliminary base or square base. Make sure the open edges are at the bottom.
8. With the open edges pointing towards you, take the top layer of the right flap. Fold the right edge of this flap inwards to meet the center vertical crease. Crease firmly.
9. Repeat step 8 with the top layer of the left flap. Fold the left edge of this flap inwards to meet the center vertical crease. Crease firmly. You should now have a kite shape on the top layer.
10. Take the top triangular point (the one formed by the folds you just made) and fold it down over the two flaps you just created. The tip of this triangle should reach the point where the two side edges meet at the center. Crease firmly.
11. Now, unfold the last three folds you made (steps 8, 9, and 10). You’ll see the creases you’ve made.
12. Lift the very top layer of the paper at the bottom point. Open it up and flatten it out by bringing the side edges outwards and upwards, using the creases you just made to guide you. This is a petal fold. The point that was at the bottom will now be at the top, forming a diamond shape. Ensure the edges align with the center crease.
13. Flip the entire model over.
14. Repeat steps 8 through 12 on this side. You’ll fold the right edge of the top flap to the center, then the left edge to the center, then fold the top triangle down. Unfold these three folds, then perform the petal fold. You should now have a shape that looks like a diamond on both sides.
15. With the open ends pointing downwards, take the right flap of the top layer. Fold its right edge to meet the center vertical crease. Crease firmly.
16. Repeat step 15 with the left flap of the top layer, folding its left edge to meet the center vertical crease. Crease firmly.
17. Now, take the right flap of the *second* layer from the top. Fold its right edge to meet the center vertical crease. Crease firmly.
18. Repeat step 17 with the left flap of the *second* layer from the top, folding its left edge to meet the center vertical crease. Crease firmly. Your paper will now look like it has many narrow panels.
19. Flip the model over.
20. Repeat steps 15 through 18 on this side. You will be folding the right and left edges of the top two layers to meet the center vertical crease.
21. You should now have a shape that is long and narrow, with multiple flaps. Look at the top. You’ll see three points sticking up. Gently pull these points outwards and upwards. As you pull, the sides will naturally start to curve inwards.
22. Continue gently pulling the points outwards and coaxing the sides inwards. The paper will begin to form a spherical shape. You’re essentially opening up the hidden pleats and allowing the paper to form the globe. Gently guide the paper to create a smooth, rounded form.
23. You’ve done it! You’ve created your Triskele Paper Globe. You can gently shape it to make it as round as possible.
Common Pitfalls and How to Avoid Them
As a beginner, there are a couple of places where you might encounter a little difficulty. Don’t worry, these are totally normal!
- Imprecise Base Folds: This is probably the most common issue. If your initial diagonal and horizontal/vertical folds aren’t perfectly aligned, the preliminary base won’t form neatly, and subsequent folds will be off.
- To Avoid: Take your time with those first few folds. Line up the corners and edges *exactly* before you make a crease. Gently crease, then go back and reinforce it to make it sharp.
- Difficulty with the Petal Fold: The petal fold (step 12 and 14) can be a bit tricky. It requires opening up a layer and flattening it while simultaneously bringing the sides in.
- To Avoid: Make sure you’ve creased those guiding folds (steps 8-10) very clearly. When you lift the bottom point, visualize the creases you made. Gently pull the sides outwards along those creases. Don’t force it; let the creases guide the paper. It might help to gently pre-crease the sides inwards slightly before you start the petal fold.
- Struggling to Open the Globe: The final step of opening up the globe can feel like you’re going to rip the paper.
- To Avoid: Be gentle! You’re not forcing the paper open; you’re coaxing it. Pull the top points *slowly* and evenly. As you pull, the internal structure will start to reveal itself. If it feels like it’s tearing, stop, gently readjust, and try again with a lighter touch. The paper’s own structure should allow it to open.
Don’t be discouraged if your first attempt isn’t perfect. Each fold you make builds your understanding and skill.
Varying Your Triskele Globes: A World of Possibilities
Once you’ve mastered the basic fold, the possibilities for variation are endless!
- Size: Simply start with larger or smaller square pieces of paper. A 12-inch square will make a substantial globe, while a 4-inch square will create delicate little ornaments.
- Paper Pattern: This is where the magic truly happens!
- Double-Sided Patterned Paper: Using patterned paper for both sides will create intricate visual effects as the inside and outside of the globe show different designs or complementary colors.
- Layering and Collage: You could even try gluing very thin, patterned paper onto a base paper before you start folding to create unique textures.
- Color: Don’t be afraid to experiment with bold colors, pastels, metallics, or even translucent papers for a truly ethereal look. Think about color combinations that complement each other.
- Adding Embellishments: Once the globe is formed, you can very carefully add a small bead or charm to the very top point.
Displaying and Gifting Your Beautiful Creations
These Triskele Paper Globes are more than just origami; they are works of art.
- Display:
- Hanging Ornaments: Thread a fine ribbon or string through the top point, and hang them from the ceiling, in a window, or from branches to create a mesmerizing mobile.
- Table Centerpieces: Arrange several globes of varying sizes and colors on a table for a stunning display.
- Shelf Decor: Place them on bookshelves or mantels for a touch of handmade elegance.
- Fairy Lights: Gently place a small battery-operated LED fairy light inside a larger globe for a magical glow.
- Gifting:
- Thoughtful Gifts: A handmade gift is always special. These globes are perfect for birthdays, holidays, or just to show someone you care.
- Gift Toppers: Attach a small globe to the top of a wrapped gift for an extra special touch.
- Party Favors: For a special event, smaller versions can serve as beautiful and unique party favors.
I hope you’ve enjoyed this journey into the world of Triskele Paper Globes. Remember to be patient with yourself, embrace the process, and most importantly, have fun creating these beautiful paper treasures!
Conclusion
Congratulations on completing your beautiful Triskele Paper Globe! We hope you enjoyed this delightful origami journey. Don’t worry if your first attempt wasn’t absolutely perfect; every fold is a learning experience, and practice truly makes progress. We’d love to see your stunning handmade 3D ornament! Feel free to share your finished creations.
For your next adventure, why not try a different color palette or experiment with slightly thicker paper for a more robust Triskele paper globe? You could even try folding a set in various sizes! There are so many more wonderful paper projects waiting to be discovered. Happy folding!


